The first step was to find a decent API for the Internet Archive. It
supports Memento, an HTTP-based protocol defined in the RFC 7089 in
Using the memento_client wrapper, we can get the closest snapshot
of a website at a given date with the following Python code:
from datetime import datetime, timedelta
from memento_client import MementoClient

mc = MementoClient(timegate_uri="https://web.archive.org/web/",
        check_native_timegate=False)

def get_snapshot_url(url, dt):
    info = mc.get_memento_info(url, dt)
    closest = info.get("mementos", {}).get("closest")
    if closest:
        return closest["uri"][0]

# As an example, let’s look at StackOverflow two weeks ago
url = "https://stackoverflow.com/"
two_weeks_ago = datetime.now() - timedelta(weeks=2)
snapshot_url = get_snapshot_url(url, two_weeks_ago)

print("StackOverflow from ~2 weeks ago: %s" % snapshot_url)
Don’t forget to install the memento_client lib:
pip install memento_client
Note this gives us the closest snapshot, so it might not be exactly two
weeks ago.
We can use this code to loop using an increasing time delta in order to get
snapshots at different times. But we don’t only want to get the URLs. We wants
to make a screenshot of each one.
The easiest way to programmatically take a screenshot of a webpage is probably
to use Selenium. I used Chrome as a driver; you can either download
it from the ChromeDriver website or run the following command
if you’re on a Mac with Homebrew:
If you run the code above, you should see a Chrome window open, go at the URL
by itself, then close once the page is fully charged. You now have a screenshot
of this page in stackoverflow_20181119211854.png! However, you’ll quickly
notice the screenshot includes the Wayback Machine’s header over the top of the
website:
This is handy when browsing through snapshots by hand, but not so much when we
access them from Python.
Fortunately, we can get a header-less URL by changing it a bit: we can
append id_ to the end of the date in order to get the page exactly as it was
when the bot crawled it. However, this means it links to CSS and JS files that
may not exist anymore. We can get a URL to an archived page that has been
slightly modified to replace links with their archived version using im_
instead.
Page with header and rewritten links:
https://web.archive.org/web/20181119211854/...
Original page, as it was when crawled:
https://web.archive.org/web/20181119211854id_/...
Original page with rewritten links:
https://web.archive.org/web/20181119211854im_/...
Re-running the code using the modified URL gives us the correct screenshot:
Joining the two bits of code we can make screenshots of a URL at different
intervals. You may want to check the images once it’s done to remove
inconsistencies. For example, the archived snapshots of Google’s homepage
aren’t all in the same language.
Once we have all images, we can generate a gif using Imagemagick:
convert -delay 50 -loop 1 *.png stackoverflow.gif
I used the following parameters:
-delay 50: change frame every 0.5s. The number is in 100th of a second.
-loop 1: loop only once over all the frames. The default is to make an
infinite loop but it doesn’t really make sense here.
You may want to play with the -delay parameter depending on how many images
you have as well as how often the website changes.
I also made a version with Google (~10MB) at 5 frames per second,
with -delay 20. I used the same delay
as the StackOverflow gif: at least 5 weeks between each screenshot. You
can see which year the screenshot is from by looking at the bottom of each
image.
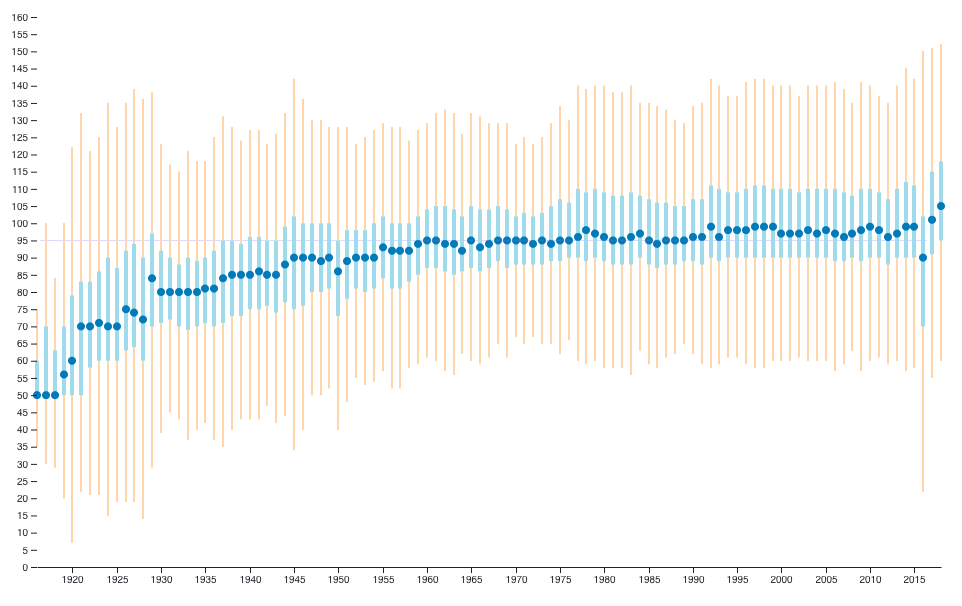
It started with a question: “Are movies getting longer and longer?”. Spoiler:
Not really, except maybe in the last couple of years.
I used Wikidata’s online query service to export all movies then
filtered those with both a publication date and a duration. This gave me a
large JSON which I processed using Python in order to extract a couple
numbers for each year: min, max, median, first and third quartiles.
The result fits in a small JSON file, which I then used to build a
D3 using a few lines of JS. I used colorbrewer2 to find a
colorblind-safe color palette.
You can see the result as well as the JS code on Observable.
To avoid outliers such as “Modern Times Forever” (240 hours) or
“The Burning of the Red Lotus Temple”, I used the interquartile
range (IQR) to limit the size of the bars: any movie whose duration is
below Q1-1.5×IQR or above Q3+1.5×IQR (where Q1 is the first quartile and
Q3 the third one) is not shown.
Results
As one can see on the graph, the median duration quickly rises from 50 to 95
minutes from the 1920s to the 1960s, then doesn’t move much except in the last
two years.
Limitations
The first obvious limitation is the data: Wikidata has 200k+ movies but only
73k have both a publication date and a duration. It’s not complete enough to
let me filter by movie type; e.g. feature film vs. others.
IMDb lists 5.3M titles (most of which are TV episodes), but there’s no way
to export them all.
In the end, there’s no way to know how representative Wikidata’s movies dataset
is. It does give a hint, but this graph is not a definitive answer to the
original question.
Mattermost is a Slack-like self-hosted and open-source alternative. We
use it at work but for some reason link previews don’t work. Before diving into
Mattermost’s internals I wanted to see if I could write a quick workaround
using the fact that Mattermost does show an image if you post a link ending
with .png or .jpg.
The Current Situation
When you post an image link, Mattermost makes a request to show it in the
application. It detects those images using a regexp; not by e.g.
sending a HEAD request to get the content type. If you have an image URL that
doesn’t end with common extentions Mattermost won’t show it.
Mattermost doesn’t serve you a preview of the image; it rather gives you an
img with the original URL. That means every single person reading the channel
will request the image from its original location. Slack, on the other hand,
fetch images, cache them, and serves them from its own domain,
https://slack-imgs.com. Slack uses a custom user-agent for its request so you
know where it comes from.
User-Agent: Slackbot-LinkExpanding 1.0 (…)
Mattermost, on the other hand, can’t use a custom user-agent because the
request is done by your browser. The only thing distinguishing Mattermost’s
request for a preview and any other request is it asks for an image:
Accept: image/webp,image/*,*/*;q=0.8
The header above is Chrome telling the Web server it can deal with WebP
images, then images in any format, then anything; in that order. Note
it explicitly says it accepts WebP images because some
browsers don’t support the format.
Unfortunately not all browsers are explicit. Firefox sends Accept: */* since
Firefox 47 and so did IE8 and earlier versions. In those cases we can’t
really do anything beside complicated rules based on the user-agent and other
headers.
Proxying Requests
If we know how to tell if a request comes from Mattermost asking for an image
preview rather than a “normal” user we can serve different contents to them: a
link preview as an image to Mattermost, and the normal content to the user.
All we have to do is to make some sort of intelligent proxy. Using Flask we
can make something like this:
fromflaskimportFlaskapp=Flask(__name__)@app.route("/<path:path>/p.png")defmain(path):ifnotrequest.headers.get("Accept","").startswith("image/"):returnredirect(path)return"Hello, I'm an image"
This is a small web application that takes any route in the form of
/<url>/p.png and either redirects you to that URL if your Accept header
doesn’t start with image/; either serves you a Hello, I'm an image page.
All we have to do now is to return an actual image in lieu of that placeholder
text. I used Requests and Beautiful Soup to fetch and parse
webpages, and Pillow to generate images.
When one requests http://example.com/http://...some...url.../p.png, the
app fetches that URL; parses it to extract its title and some excerpt; write
that on a blank image; and serves it.
Extracting the title is as easy as grabbing that title HTML tag. If
available, I also try the og:title and twitter:titlemeta tags. If none
of those are available, I fallback on the first h1 or h2 tag.
Getting an usable excerpt is not too hard; here again I search for common
meta tags: description, og:description, twitter:description. If I can’t
get any of them I take the first p that looks long enough.
The Pillow library makes it easy to write text on an image. I replaced the
(ugly) default font with Alegreya. The tricky part is mostly to fit the
text on the image. I used a combination of Draw#textsize
to get the dimensions of some text as if it were written on the image and
Python’s textwrap module to cut the title and excerpt so that
they wouldn’t cross the right side of the image.
I used fixed dimensions for all images (400×70) and kept a small padding along
their sides. Previews with small or missing excerpts get some unused white
space at the bottom; this could be fixed by pre-computing the final size of the
image before creating it.
Google.com’s generated previewGitHub repos have a very small excerpt
On most websites the preview works fine. We could tweak the text size as well
as add a favicon or an extracted image.
This post’s generated preview
Conclusion
In the end it took a couple hours to have a working prototype. Most of that
time was spent dealing with encoding issues and trying various webpages to find
edge cases.
The result is acceptable; it has the issue of not being accessible at all but
that’s still better than nothing.


